Wednesday, September 30, 2009

Tricolor fried rice


The other evening when I stepped in my kitchen after a long day, was totally blank in my mind and wasn’t sure what to do. But was certainly very hungry…. I am used to eating a big meal with rice for lunch and a light dinner, but this day I had a lot of rice left since I hardly had time to eat anything at lunch. Just instantly pulled out some veggies in queue from my fridge and started to make this fried rice without a plan. At the end was amazed at how beautiful it turned out and just took about 15 min to make. We took some snaps and enjoyed this satisfying one pot meal. Sometimes simple things bestow such incredible bliss…..cheers!


Ingredients:

2-3 cups leftover or precooked white rice (if you do not have and want to make this cook some rice quickly using a rice cooker and follow the recipe)
1 red bell pepper cut to small cubes
1 tomato thinly sliced
1 cup garden peas (frozen or fresh soaked)
2 green chillies chopped
3 tbsp cashew nuts
1 tsp turmeric
1 tsp cumin
2tsp garlic paste
1 tsp garam masala (optional)
6-8 curry leaves
3 tbsp oil
Salt to taste

Method:

In a large pan/kadai heat oil, add the cumin seeds garlic paste and turmeric, half the curry leaves and cashew nuts. If you desire it to be more spicy add the garam masala (the garlic and cumin seeds render it enough flavor already). When the cashews turn lightly brown, stir in the peas, red pepper and sauté for 3-4 mins. As the pepper gets a little tender add the tomatoes and sauté another 2-3 min. Now stir in the rice and mix thoroughly and let fry on simmer for about 4 min. Adjust the salt and garnish with curry leaves


Serve serve hot with raita. Recipe for a quick raita here.


Enjoy!

Monday, September 28, 2009

Minapa-Sunnundalu (Roasted urad laddus)


Urad daal referred to as black gram called “minimulu” in telugu is used widely in Andhra cooking. I have posted many recipes using this protein rich ingredient starting with the breakfast dishes as idli, vada, dosa, utappam to the festive snack - Janthikalu all of which are savory dishes. Did you know you can make a sweet dish with this lentil? 

This  Andhra treat—“Minapa-Sunnundalu” is made along with urad daal; ghee and jaggery the other two awesome ingredients.

Ghee or clarified butter is rich in iron, and used extensively in ayurvedic therapies for its medicinal uses, it is devoid of hydrogenated oils and is preferred over butter for its health benefits. Due to its properties in promoting brain health and development, learning, memory, it is highly recommended in Ayurveda for growing kids.

The third ingredient is jaggery (molasses or unrefined cane sugar) which is a wonderful substitute for sugar and has an earthy flavor. This, three ingredient sweet is a healthy nutritious delectable, one can have anytime.  Amazing mix of these three ingredients simply makes them melt in your mouth.....So why not try some..... 


Ingredients:

2 cups minappapu (Urad daal/Black gram)
2 cups jaggery
1/2 cup ghee (clarified butter)
1 tsp cardamom powder.

Method:

Dry Roast the Urad daal till it turns golden brown. Grind it to a fine powder. 
The powdered roasted urad called minapa sunni can be stored airtight for a month or more if desired to prepare the sunnundala as and when you like. Proceed with the following process when ready to make- to the minapa sunni in  a large bowl stir in grated or coarsely powdered jaggery, melted ghee and cardamom, mix thoroughly and shape into small balls or laddus of desired size, using your palms. Sunnundalu are ready to relish- enjoy!


Nutrition: A healthy sweet treat loaded with protein and Iron.

I am reposting this recipe for the festive treat event hosted by simple indian food


And to FIL –Ghee sweets hosted by Sanghi of Sanghi’s food delights


Jaggery on FoodistaUrad Dal on Foodista

Friday, September 25, 2009

Janthikalu - a crispy Andhra snack


Wish you all a Marvelous Navarathri Dear Friends!!


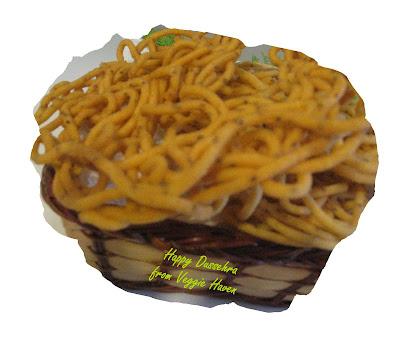
Navarathri or Dussehra for those who are unaware is a big Indian festival that marks the victory of Godess Durga over the demons -lead by Mahishsura. It depicts triumph of good over evil. Indian festivals are all fun & frolic. On this occasion and other festivals approaching shortly, Shanthi from Shanthi Krishnakumar’s cookbook is hosting an event on “Dusserah Dhantera’s and Deepavali” and I am delighted to send this basket of “Janthikalu”, photo for now friends :-) and the following post for all the fellow foodies to cherish.

Food is an integral part of all Indian festivities. Each regional cuisine in India has its own traditional foods and recipes passed down the generations. I would like to share with you, a native Andhra classic “pindi vanta”. “Pindi vantalu” is a telugu word that directly translates to “flour based dishes”. These are rustic dishes that are made from freshly ground flours from new  grain harvest. Janthikalu that I am going to present here is one such dish. The procedure to make it is a elaborate, but it is every ones favorite. It is so addictive that one can’t stop eating this crispy snack. There are a variety of its versions made using different kinds of flours like besan (chick pea), rice, urad  or combinations. These are called by different names as “Chakkilalu”, “karappusa” “Murukulu” etc. in various dialects.The ones I made in this recipe are using rice and urad flour.  This recipe was passed on from my mother-in-law and is the gold standard for making janthikalu in my kitchen and hope it will interest you..

Now coming to the procedure to make janthikalu, you will need the tool called “Janthikala gottam”, also called murukku maker, or karappusa giddalu shown in the picture below. The one I used here was inherited from my M-I-L. You should be able to shop for these online as well.


My mom-in-law in her original recipe uses the freshly ground flour in a proportion of four cups (soak- dried) rice with ½ cup urad as there is accessibility to plenty of grinding mills back home. But I improvised it by use of store bought rice flour and urad flour directly and the taste and crunchiness translates pretty well. So this infact is much simplified and can be made instantly without involving grinding.
Ingredients for this recipe are:
4 cups Rice flour
½ cup urad flour
1 cup melted butter
2 tsp ajwain seeds
3 tsp sesame seeds
1-2 tsp red pepper powder (based on how hot you would like it)
Salt to taste
Enough luke warm water to knead the above (into a dough like for chapathi or pizza dough consistency)
Oil for deep frying

Procedure
Take the flour into a large bowl, add all the rest of ingredients and melted butter and Knead well into soft dough. The kneaded flour should be used immediately. If left for too long janthikalu will loose their crispness and turn out hard. So if you plan to make larger quantities (than this one) then knead and prepare in batches one after another.
Heat oil in a large deep pan for deep frying. Select the little plates of the gottam with desired shape and fix it into the janthikala gottam or muruku maker.

Divide the kneaded dough into small balls to the size enough to fit in the Janthikala gottam and place it in the outer dough holder. Now squeeze release the dough using the inner press into preheated oil for deepfrying.


Fry the janthikalu until golden yellow and remove from pan using a appropriate spatula. Drain excess oil onto paper towels. Now repeat the process until all the dough is used up.
Let the janthikalu cool off and store them packed in an airtight container. They store well for a couple of weeks or even a month when stored airtight.


Enjoy your crispy snack anytime. I bet you cannot stop eating it once you begin, so make sure to cook up plenty:-)

One again a Happy Dussehra and a Wonderful weekend ahead! Enjoy!

Recipe for event -  “Dusserah Dhantera’s and Deepavali


Wednesday, September 23, 2009

Mysore bhajji


After some enjoyable experimentation with unconventional dishes, I felt like writing about some traditional recipes. I had on my list these Mysore Bhajji, I was intending to write for quite sometime now. Now since it is Navarathri, we are all eagerly preparing for those classic dishes and looking forward to gettogethers with friends and family. This is an inviting dish you can entertain your guests with. It could well serve for a breakfast with some yummy coconut chutney, or even an appetizer on a big lunch or dinner menu. Or just make a bunch of these for kids to munch on as finger food, while you are busy preparing those big festive meals. I made these one weekend a few days back for an afternoon snack.

You will need for this:
2 cups of maida (cant find this...try these substitutes -- all purpose flour)
3/4 cup plain yoghurt (curds)
2 green chillies
1/2 an onion chopped
1 tsp cumin
salt to taste
oil for deep frying

Seive the maida in a large bowl. Stir in yoghurt (I used homemade, whole milk yoghurt) salt and knead into a smooth dough and leave it for about 4 hr (or prepare the dough in the evening for making mysore bhajji the next morning.
Just when you are ready to make, Grind the onion, chillies and cumin together coarsely into a paste and mix with the dough (If you wish can directly use the finely chopped ones directly). You can also mix a pinchof cooking soda if you feel the dough hasnt risen enough to get fluffy bhajjis, but this is optional. I did'nt use any here.
Heat oil in a deep pan for deep frying. Drop scoopfulls of dough into the oil and fry till golden brown turning them occasionally. Remove them from oil, drain off excess onto papertowels and Mysore bhajji are ready to serve. Enjoy!!


I am sending this recipe to Kids delight event hosted by Srivalli of Spice your life


Awards

Thank you Tresa from Joy of Cooking for sharing these lovely awards with me. It really boosts my enthusiasm.


Monday, September 21, 2009

Quick and easy dinner rolls topped with sesame seeds

I love to pair these quick and easy to make dinner rolls with a hot soup or pasta dish to have an excellent fall dinner.

Ingredients:
1½ cup self rising flour
¾ cup milk
2 tbsp mayonnaise
½ tsp salt
1 tsp garlic powder
1 tsp ajwain seeds
2 tbsp sesame seeds for topping


Method:
In a large bowl sift the flour. To it add rest of the ingredients except sesame seeds and beat briskly using a hand mixer. Spoon the dough into muffin cups in a muffin pan. Sprinkle the sesame seeds on top.
Bake in a preheated 350oC oven for 15-18 min until the rolls are done and golden brown.


Serving suggestions: Serve hot or cold with butter and a hot soup of choice.


Sunday, September 20, 2009

Award and nominations

I was taken by surprise and really thrilled, when I received a message from Dear Sangeetha from kothiyavunu , generously nominating me along with six other foodie friends for the "kreativ blogger award". Thank you so much Sangeetha for sharing this award with me. This is my first award as a blogger. All your comments, feedback and encouragement fuel my enthusiasm to bring forth my thoughts to you all.


Now is the time to confess…. Being by nature a very quiet person, I started this blog to indulge in my favorite and an essential hobby cooking. Then I started sharing (sometime in 2008). And there was a long break due to lack of time and being tied with my babies. I am back now for the past few months actively engaged on this saga. Although my family cherishes my cooking and I do quite a good job at it I can say, I previously never used to keep any measurements of ingredients. I just knew how much I intended to add and what, but never had it all organized. Now that I am bringing the recipes out to you, I found out how hard it is to keep track of the precise amounts. I greatly appreciate the preciseness of my fellow bloggers in this aspect. I can proudly say that I have myself also almost come unto this track. Kitchen is my (secret) resort where I really gather my thoughts… be it day to day activities or related to my profession (will talk about this another time). Aside from cooking in my quiet moments I enjoy the melodious music of MS. Subbalakshmi, and some of  my collections you can find as part of my pages although unrelated to cooking.


Ok friends now coming to the award… my very first one…. As per the rules I have revealed above at least seven things about myself. Now I would like to share this lovely award with my foodie friends who have fabricated and shared awe-inspiring, fabulous blogs. Some of you may already have received this award, but I still would like to share with all due admiration to your creativity.

1. Sunanda from Sunanda’ s Kitchen
2. VS from A foodie in her cooking hat
3. Priya from Priya’s easy and tasty recipes
4. Sireesha from Mom’s recipes
5. Snacksgiving
6. Aruna Manikandan at Veggie Paradise
7. Anncoo from Anncoo’s Hobby

Congratulations friends! Enjoy your award and Keep rocking!!!

Here are the rules I gathered from prior inheriters of this award-
1. You must thank the person who has given you the award.
2. Copy the logo and place it on your blog.
3. Link to the person who has nominated you for the award.
4. Name 7 things about yourself that people might find interesting.
5. Nominate 7 other Kreativ Bloggers.
6. Post links to the 7 blogs you nominate.
7. Leave a comment on which of the blogs to let them know they have been nominated.

Saturday, September 19, 2009

Lettuce apple salad

Refreshing salad with a flavorful yoghurt dressing


This salad is most healthy and nutritious with all the good stuff right in here. Here are some interesting facts about the goodies used here and six reasons why you should eat this-

Did you know lettuce is the second most popular vegetable in US (potatoes are the first) and the oldest one ever known.


'An apple a day keeps the doctor away', well here's another way you can relish it today....


Walnuts used in this salad have the omega 3 fatty acids which are a very essential fat that we all need especially women. Did you know researchers found that teenagers who ate these nuts in their salads on a regular basis were less prone to acne as opposed to those who ate other nuts such as almonds so if you have a teenager at home let them try this out...

Scallions are free of sodium, fat and cholesterol, and provide dietary fiber, vitamin C, vitamin B6, potassium and other key nutrients. They are low calorie adding abundant flavor to foods.

The yoghurt dressing has less fat, you could use low fat yoghurt and you get the dose of calcium in it as against mayonaise or other fat containing dressings.


Cardomom referred to as the "spice of paradise" gives this dressing and this salad a very distinct taste. Cardomom has antimicrobial and antiseptic properties and is good for digestive health.

Ingredients:
1 cup chopped iceberg lettuce
Half and apple sliced length wise and a quarter cubed
¼ cup scallions chopped
3 tbsp walnuts chopped

Dressing:
3 tbsp yoghurt
1/2 tsp sugar or equivalent sweet and lo
1 tsp cardamom powder
Mix all the three


Arrange the salad by spreading the lettuce on the plate. Top it with the sliced apple and the cubes in the center. Sprinkle the chopped scallion and walnuts and serve with the dressing


Thursday, September 17, 2009

Chunky Zucchini and Tomato Raita

Some of you may wonder how one can eat the hot and spicy Indian dishes. Well here is one secret, Indian cuisine uses a lot of yoghurt and yoghurt based accompaniments with most of the hot spicy main dishes. Raita is one such side dish or sauce that is very traditional north Indian side with many rice dishes as the hot and spicy Biryani, fried rice, or pulaos. This is very cooling, mellow creamy sauce made in yoghurt base with zuchhini, tomatoes onions and herbs. Besides yoghurt as we all know has the much needed calcium which is another reason we should enjoy this in the most tasty form.  Here is a very simple and zesty Raita for a quick fix side, you can enjoy with a hot rice dish or even naan. The procedure to make is also simple and does not need a lot of preparation and more so there is no cooking involved.


Ingredients:
1 zucchini -grated or cut to thinly sliced
2 small tomato – thinly cut
1 small onion –thinly sliced
2 cups plain yoghurt
Salt to taste
1 twig –cilantro leaves
2 tsp lemon juice

Method:
Mix grated zucchini tomato onions, in the yoghurt. Adjust the salt and stir in the lemon juice. Mix well, garnish with cilantro and serve


Serving suggestion: Serve with pulao, fried rice or chapathi


There are various other more sophisticated versions of raita and i will cover those another time.

Tuesday, September 15, 2009

Matar Paneer

Matar paneer is a classic north Indian curry made with green peas-“matar” and Indian cheese- “paneer” as the name suggests. One can tell from the ingredients it is highly proteinaceous with a considerable amount of fat in the paneer. It is made very tasty and spicy by use of the typical Indian spice the garam masala which adds significant heat to the dish and dhania (coriander seed) powder. It is quintessentially on menu in any north Indian restaurant you may visit. Although the procedure to make it is a little elaborate the result is delectable. Here is a simpified recipe you can follow to make it at home and enjoy-:)


Ingredients:
2 cups garden peas (canned or presoaked in water if using dried ones)
1 cup cubed paneer
1 large onion – thinly sliced
1 cup tomato puree
½ cup milk
3 tbsp oil
1 tsp turmeric
1 tsp cumin
2 tbsp garlic paste
1 tbsp dhania powder (coriander seed powder)
1 tbsp garam masala
Salt to taste


For marinating paneer:
1 tbsp red pepper powder or paprika
2 tsp lemon juice
1 tsp ginger paste
1 tsp salt

Method
Marinate the paneer first by mixing all the marinating ingredients with cubed paneer and store in refrigerator for an hour or more. If desired to avoid the sweet taste from peas as some people may wish, also marinate the peas in the same manner separately (or you may use them as is)


Heat 2 tsp oil in a pan; add turmeric, cumin the sliced onions and garlic paste and sauté. Now add dhania powder and garam masala and mix well. Add the paneer and sauté until they turn golden brown and are cooked well and devoid of that raw taste. Follow it with peas and stir in the tomato puree and let cook until it blends well. If desired for a creamy taste add half a cup milk and cook until the gravy is reduced and all the flavors infused into the peas and paneer. Adjust the salt. Turn of the heat, garnish with fresh chopped cilantro and serve hot

Variations: If paneer is added direcly to the dish, usually you get a raw taste so one has to fry or cook it enough before adding to the dish. If you plan ahead paneer can be prepared in different ways for the dish. One way is to roast the marinated paneer in an oven at 350oC until they turn golden brown and can be added to the sautéed onions as above. Or you can pan roast the paneer separately before mixing it with the cooked onions.
Serving suggestions: Serve with chapathi, puri or any north Indian bread as naan, paratha, kulcha or rice.

Saturday, September 12, 2009

Breakfast wraps

Eggs are packed with protein in as low as 75 calories per egg. They contain the zinc that boosts metabolism and immunity. They contain vitamin B12 that is important for cell production and renewal and many more goodies. Read more on these incredible eggs here.

Eggs with veggies, wrapped in a low fat tortialla are a perfect way to start your day. These are quick and easy to make and fill you up without adding too many calories and keep you charged until lunch. Here is my kids favorite breakfast recipe for wraps-
Ingredients:
2 whole grain flour tortialla
2 eggs
6-8 spinach leaves
1 tbsp Shredded cheese of choice (optional – I used here cheddar & jack mix)
2 tsp ketchup or salsa
1 tbsp cream chesses

Method:

Make an omlet by breaking the eggs. You could use whites exclusively if you like a cholesterol free recipe.

Lay the tortilla on a cooking surface. Spread the cream cheese and top it with ketchup. Spread out the fresh spinach. And on top the omlet. Roll the tortilla into a wrap. And half it using a knife or pizza cutter and your healthy breakfast wraps are ready to go.
Serves 4
Tips and Serving suggestion:
Heating the tortialla for a min on skillet before making the wraps makes them slightly crispy.
Kick start your day with a tortilla egg wrap and a cup of orange juice.

Tuesday, September 8, 2009

Egg noodles in peanut sauce

I am a big fan of Thai food. I always order especially the pad thai or noodles that are my favorite when I visit a Thai restaurant. I am inspired by the use of peanuts, coconut, sesame seeds and peanut sauce in Thai cusine. Here is one recipe for egg noodles that I often make following a combination of recipes that I read elsewhere. I tweaked it a little here by including grated panner (Indian Cheese) and use of a different combination of veggies I felt like and had on hand at that time.  


Ingredients:
1 pack Egg noodles
½ cup thinly sliced roasted paneer
3 tbsp oil

1/2 cup roasted peanuts - powdered
2 tsp sesame seeds
3 tbsp Soy sauce
2 tbsp cooking wine
½ cup tamarind juice
1 tbsp garlic paste
½ cup scallion chopped
½ cup French cut beans
1 cup cauliflower florets

3 tbsp toasted cashew nuts


Method:
Cook the noodles as per package directions, drain excess water and keep aside. (Save some of the water in which you cook noodles for later to dilute the sauce)
Heat oil in a wok. Add the sesame seeds garlic paste, half of the scallions, beans and cauliflower and cook until tender. To the cooked vegetables add the tamarind juice, soy sauce, wine. Adjust the salt and cook until the oil leaves the sides.
Stir in the cooked noodles and mix for a couple of mins on low flame. If required add some of the water used to cook the noodles to dilute to required consistency. Stir in the peanut powder and mix well. Turn off the flame. Garnish with toasted cashew nuts and chopped scallions and serve hot.


Serving suggestions: Serve hot or cold with hot sauce peanut or soy sauce.
I used here store bought Thai peanut sauce diluted with soy sauce, lemon juice (equal parts) and a tsp of honey.

Sunday, September 6, 2009

Cucumber/Zuchhini fritters


Ingredients:
1/2 cup urad flour

1 cups rice flour
2 cups water
Salt to taste
1 tsp cumin seeds
2 large zucchini sliced in cross-sections
Oil for deep frying


Method:
Prepare the batter by mixing the flours in water and salt. Let it ferment overnight. When the batter is fermented well and puffy add the cumin seeds and mix before frying.
Heat oil in a wok. Dip the cut zuchini in batter and drop into the oil slowly. Deep fry until golden brown. Drain off excess oil onto paper towels. Serve hot.


Serving suggestions: Sprinkle chat masala on top and serve with ketchup or green coriander chutney
These can be prepared with left over dosa batter as well.

Friday, September 4, 2009

Uttappam

Uttappam always reminds me of my college days when I first tasted it on our visit to Palani in Tamilnadu (South India). Although at that time I was least worried about the process of making it, its lingerning taste and memories of it remained over years. Although this dish actually originates in Tamilnadu we from Andhra make similar versions of it. "Dibba rotti" is one  such version that closely resembles uttappam and is made using batter consisting ground urad daal and rice flour or idli rava similar to that of used to make idlis. This being crispy I always insisted my mother to make these whenever she had some idly batter left out.
When I first came abroad with no idli grinder in hand, craving for idli, dosa or uttappam, I discovered this "no grinding involved" recipe of mine, after a bit of trial and error. This recipe directly using the urad flour and idli rava replicates the exact taste of uttappam made by grinding the urad daal and rice. This standardized easy to make recipe is now my families all time favorite hit.


Ingredients:1 cup urad flour
2 cups idli rava
4 cups water (luke warm)
Salt to taste
½ cup sliced onions
2 green pepper chopped

Method:
Prepare batter on the day before by mixing the flour and rava in luke warm water and adjust the salt. Set aside to ferment over night.
When well fermented stir in the chopped onions and pepper and mix well. Heat the skillet. Spread about ½ tsp of oil and spread a spoon full of batter in circular movements away from the center of the skillet quickly. Usually uttappam is slightly thicker than dosa so use slightly more batter than you would for regular dosa. If desired add a little oil on edges of uttappam for getting more crispy uttappam. With a flat spatula flip to the other side and let fry till both the sides turn golden brown. Remove from skillet. Repeat the process for rest of the uttappams and serve hot with thinly sliced onions and chopped green pepper on top.


Serving suggestion: Thinly sliced tomatoes, scallions can also be used as stuffing by folding the uttappam in half.
Serve hot with any spicy chutney, sambhar or karappodi, followed by a cup of freshly brewed hot coffee. 

Thursday, September 3, 2009

Sorakaya (bottle gourd/kaddu) Curry


Bottle gourd is a tropical vegetable that seems to be originated in India and Africa. Gourds in general are low in saturated fats and cholesterol. They are rich in fibre and vitamins Riboflavin, Thiamine and vit C and milnerals - Iron, Zinc, Magnesium and Manganese. It is a good candidate for a weight loss diet. It is used in traditional medicine for treating indigestion, acidity and ulcers. Learn more about bottle gourd here.
I would like to share here a andhra style recipe for very appetizing and nourishing vegetable side using bottle gourd also called Sorakaya or anapakaya in telugu

Ingredients:

1 big sorakaya peeled and cut to small cubes
2 green peppers sliced
6-8 curry leaves,
1 tsp ginger paste
2 table spoons oil
1 tsp nutmeg
½ cup milk
3 cups water
2 tbsp maida or besan
Salt to taste
1tsp red pepper powder
For tempering:
2 tsp cumin seeds
1 tsp mustard seeds
2 teaspoons urad daal
A pinch of turmeric

Method:
Heat oil in a pan and add the tempering ingredients in order mentioned. When the mustard seeds start to splutter, add the red pepper, ginger paste and curry leaves. Stir in sliced green pepper and sorakaya, mix in with 2 cups of water and milk and cook until tender. Add the salt,red pepper powder and nutmeg and mix. Mix the maida or besan in one cup water and mix to prevent any lumps. Now slowly stir in this mix into the sorakaya curry and stir to avoid lumps. Cook for 5 more min. Take off the flame and serve hot.
Serves 6

Serving tips: This is a yummy vegetable side with puri or chapathi, and also can be served with rice

This dish has been presented to the Side dish event hosted by Viki's kitchen.


Viki's Kitchen.: Announcing an event ... 'Side dish for chapathi'


Bottle Gourd on Foodista
Blog Widget by LinkWithin

Copyright

All the pictures, content, and images are sole property of http://www.raje-s.blogspot.com, unless otherwise mentioned. Permission is required to copy, download or use any text, photographs or image files. Please contact rajeskitchen@gmail.com for all inquiries.

Page copy protected against web site content infringement by Copyscape